Try to connect to host, verify a usable python and return pong on success


pong on successIn Linux, you can verify system restarts and view reboot history using various commands and log files. Here are some methods to check and verify system restarts:
last Command:The last command displays a list of system login entries and system shutdown/reboot times. To view reboot history, run:
last reboot The output will show a list of system reboot times, who initiated the reboot, and from which terminal or IP address it occurred./var/log/messages or /var/log/syslog file typically contains reboot information. You can use grep to filter the relevant entries:
grep 'reboot' /var/log/messages orbashCopy codegrep 'reboot' /var/log/syslog This will display lines indicating system reboots along with timestamps.uptime Command:The uptime command provides information about system uptime, including the current time, how long the system has been up, and the number of logged-in users. The load average values can also give you an idea if the system recently restarted:
uptime If the system uptime is low, it suggests a recent restart./var/log/wtmp File:The /var/log/wtmp file contains a record of all logins and logouts, including system reboots. You can use the last command with the -f option to view this file:
last -f /var/log/wtmp This will display a more detailed history of logins, logouts, and reboots./var/log/audit/audit.log. You can use the ausearch and aureport commands to search for and report on reboot events in the audit log.These methods should help you verify system restarts and identify when and why they occurred. The choice of method may depend on your specific needs and the availability of logs on your system.
Run:

Use the ip command or ifconfig command (if installed) to list available network interfaces:

To identify the type of Unix or Linux system we are using run:
$ uname -a
Linux Example:
[root@redhat9-01 ~]# uname -a
Linux redhat9-01 5.14.0-284.30.1.el9_2.x86_64 #1 SMP PREEMPT_DYNAMIC Fri Aug 25 09:13:12 EDT 2023 x86_64 x86_64 x86_64 GNU/Linux
[root@redhat9-01 ~]#
AIX Example:
# uname -a
AIX crnimx01 1 7 000482ADD600
#
To verify file system utilization on Linux, you can use several commands and tools that provide information about disk space usage, including the df and du commands. Here’s how to use each of these commands:
df command is a simple and commonly used tool to display information about file system disk space utilization. By default, it shows information about mounted file systems.To display file system utilization information for all mounted partitions, run:
df -h The -h option makes the output more human-readable, showing sizes in megabytes (MB) or gigabytes (GB) instead of blocks.du command is used to estimate file and directory space usage. It’s helpful for drilling down into specific directories to see which files or directories are consuming the most space.To check the disk usage of a specific directory, navigate to that directory and run:bashCopy codedu -h The -h option, as before, makes the output human-readable.If you want to see the disk usage of the current directory and its subdirectories in a summarized form, you can use the following command:bash
du -sh * This will display the sizes of the subdirectories and files in the current directory.These commands will help you verify file system utilization on your Linux system and identify which directories or file systems are consuming the most disk space. Depending on your needs, you can choose the most suitable command for your analysis.


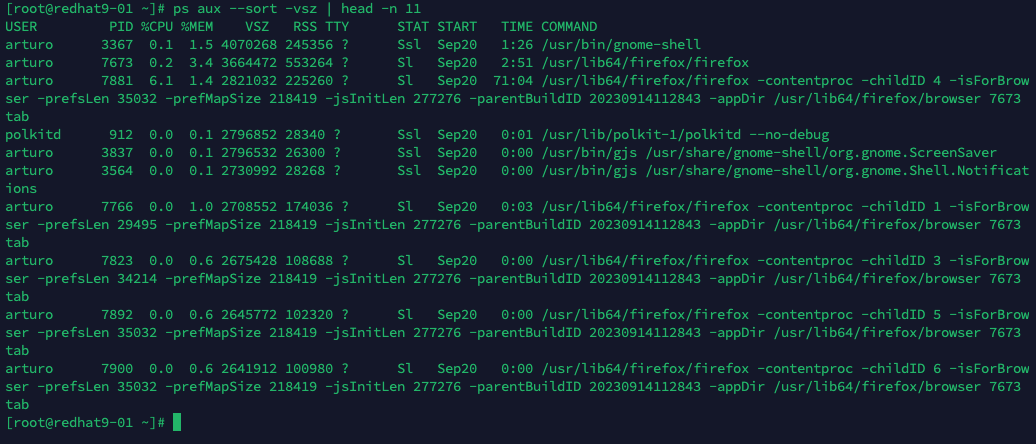
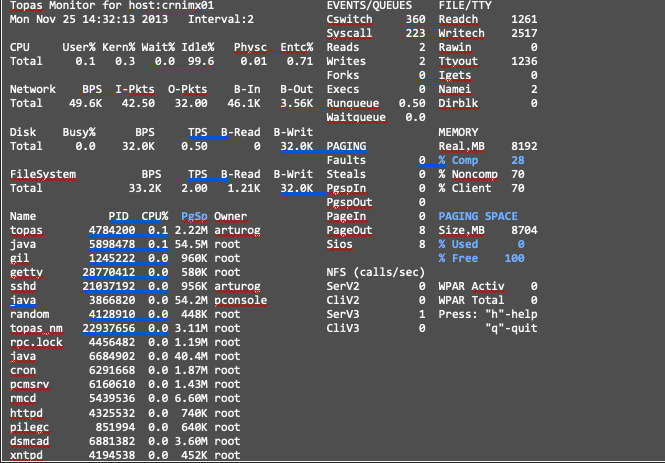
To see current swap usage utilization is using “top” (Linux, Solaris, HP-UX) or “topas” (AIX) commands. Identify memory and swap utilization.
“top” command Example:
# top

“topas” (AIX) Example:
# topas
To create an ext4 file system on Linux using LVM (Logical Volume Manager), follow these steps:
apt, and on Red Hat/CentOS, you can use yum:
For Debian/Ubuntu
sudo apt-get install lvm2 For Red Hat/CentOS
sudo yum install lvm2/dev/sdX with the appropriate device names:bash
sudo pvcreate /dev/sdXmyvg with your desired volume group name:bash
sudo vgcreate myvg /dev/sdX1 /dev/sdX2 # Use the appropriate device names/dev/myvg/mylv with your desired logical volume name and size:bash
sudo lvcreate -n mylv -L 10G myvg # Replace 10G with your desired sizemkfs.ext4 command:bash
sudo mkfs.ext4 /dev/myvg/mylvsudo mkdir /mnt/myext4 sudo mount /dev/myvg/mylv /mnt/myext4/etc/fstab file:bash
echo "/dev/myvg/mylv /mnt/myext4 ext4 defaults 0 2" | sudo tee -a /etc/fstab Replace /dev/myvg/mylv and /mnt/myext4 with your logical volume and mount point.df -h This command will show you the available disk space on the mounted ext4 file system.That’s it! You’ve created an ext4 file system on a logical volume managed by LVM. You can adjust the sizes and names to fit your specific requirements.
Troubleshooting a Linux system that does not boot can be a complex process, and the steps you take will depend on the specific symptoms and hardware involved. Here’s a general guide to help you diagnose and potentially fix the issue:
fsck or GUI-based tools./etc/default/grub and /etc/grub.d/) for errors or misconfigurations. You might need to regenerate the GRUB configuration using update-grub./var/log/syslog or /var/log/boot.log, for any clues about what’s causing the boot failure.Remember that diagnosing and troubleshooting boot issues can be complex, and it’s important to be cautious when making changes to your system. Be sure to back up your data before attempting any major fixes, and if you’re unsure about a particular step, seek assistance from experienced users or professionals.
